Today, I’m honored to hand over the blogging reigns to Jodean Cooper of Desert Plume Calligraphy. She’s going to show us how to create floral calligraphy flourishes that can perfectly embellish a note or make a beautiful art “centerpiece”. They’re a creative bouquet that will brighten anyone’s day!
I’m not much of a writer, but when Lindsey asked me to share a tutorial for floral calligraphy flourishes she found on my Instagram, I thought it was time to give it a go. The biggest reason I want to share is because I feel like learning to draw these flowers really changed my art life! That might sound dramatic, but before that day I never really believed I could make anything so pretty.
I learned this style of floral drawing from one of my earliest calligraphy crushes, the incredible Heather Held (@heathervictoria1 on Instagram). I was enchanted by her calligraphy and her delicate flower garden flourishes. Even when I had the opportunity to take her class, I never dreamed I’d be able to replicate these tiny treasures. Heather made it easy and joyful. With her permission, I’m excited to share this process with you!
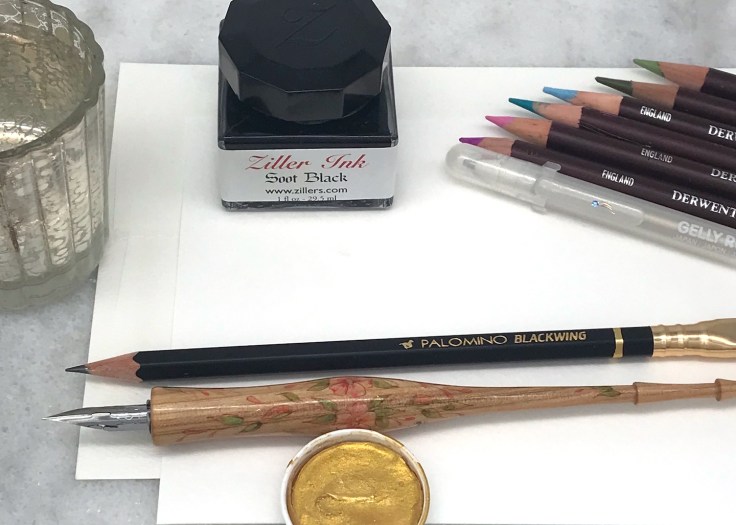
1. Gather Your Supplies
The supplies needed to create these floral calligraphy flourishes are flexible! You can work with what you have on hand, but here’s a list of what I used today:
Start by using your dip pen and ink to draw a tiny spiral with a horseshoe shape attached underneath. Then, draw a curved line across the bud. The bud size will loosely dictate the flower size.
If you’d like, you can draw the florals with a pencil first and go over it later with ink. I like to dive right in with pen and ink because I’m impatient!
Next, draw a loose heart-ish shaped petal attached to the right of the bud.
Continue to add petals, turning your paper as you go so you can surround the bud with 4-5 more heart-ish shaped petals.
Now, draw a couple of small circles on either side of the flower that you just made. These will act as the centers of two smaller flowers. Make them near the first flower! That way, when you draw the petals, they’ll appear to be tucked behind the first flower.
Next, add petals to these smaller flowers.
Once you have drawn your flowers, it’s time to add a little bit of shading. To do this, I like to add small lines at the base of each petal.
4. Embellish the Flowers
Now, let’s make a few leaves to give the flowers a bit of volume! Some leaves should peek out from behind the petals, and some can be on little stems.
Try adding tiny berries for some visual interest, or some small flower buds! Continue to build out until you’re happy with your botanical cluster.
You can stop here if you want to! These unadorned floral calligraphy flourishes are especially stunning in white ink on dark paper.
5. Add Color
There are several different ways to add color to your newly-created garden. I often use colored pencils because they’re quick and easy, but pastels or watercolors are also beautiful! No matter what medium you use for color, follow the same general guideline. First, choose the colors for your flower petals and leaves. Have one light shade and one darker shade of each of your chosen colors, if possible. Start at the base of each petal or leaf with your darker shade, and fill in those areas over the entirety of your drawing.
Next, pick up your lighter shade. Start where the dark color ends to blend the two colors together, and continue coloring to fill in your petal or leaf. For the petals, don’t bring the color all the way to the end.
To give the artwork a more polished look, you can use a cotton swab to blend the light & dark pencil together.
6. Add Some Sparkle (Optional)
If you’re in the mood to add some bling (I know I always am!) take your clear Stardust Gellyroll pen and randomly trace some of the stems in your drawing. The effect will be quite subtle — so subtle you can’t see it in my photo — but it adds a great bit of sparkle. Next, add some dots of gold Finetec watercolor. Brush the moistened watercolor onto your nib à la this tutorial, then use the nib to make little dots.
7. Admire Your Handiwork
There you have it! Have fun flourishing and sharing these beautiful florals.
I know that, like me, you’ll be amazed at the beauty you can create! To see what’s possible and get more incredible floral inspiration, follow @heathervictoria1 on Instagram. There you’ll see the possibilities really are endless. Happy floral flourishing!
About Jodean Cooper
Jodean Cooper is an artist and calligrapher who lives in Tempe, Arizona. You can find her at Desert Plume Calligraphy online, or @desertplumecalligraphy on Instagram! If you liked her tutorial, be sure to give her some love on Instagram or drop her a note to say thanks at [email protected]. I just ordered some Gellyroll Stardust pens and absolutely cannot wait to give these instructions a go!
TPK’s innovative newsletters and tutorials are a regular artistic treat. Join the 125K+ subscribers who have already discovered The Postman’s Knock, and receive 10% off your first Digital Catalog order.