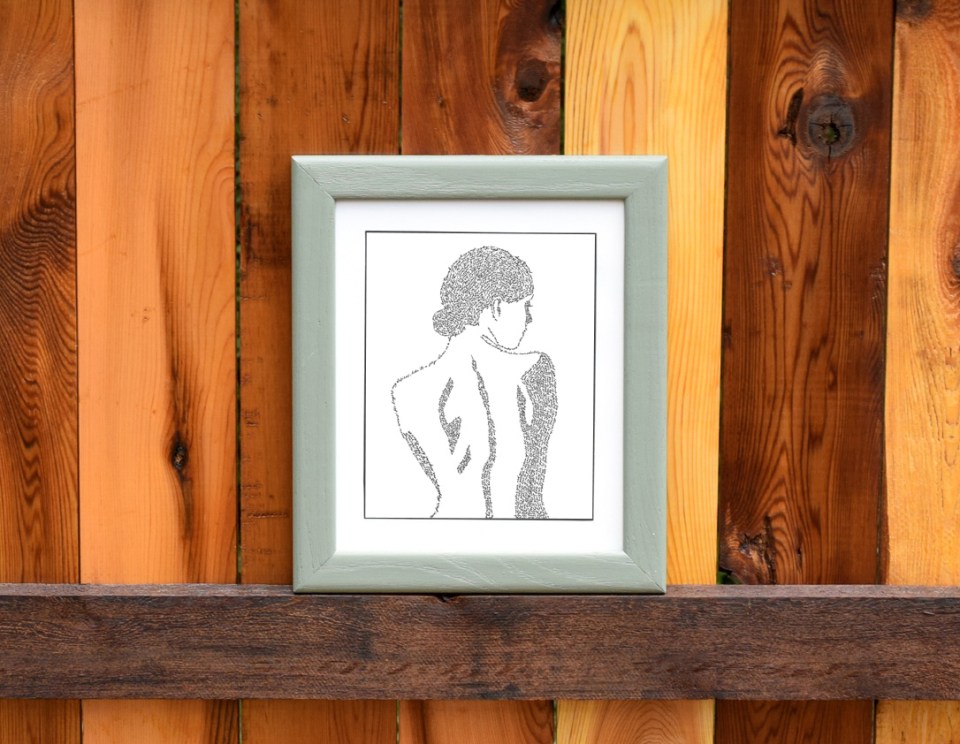
In today’s tutorial, I’ll teach you how to make some gorgeous and eye-catching calligraphy artwork depicting a woman’s silhouette! If you like this art but don’t have the time to make it, you can find a professionally-printed reproduction in the TPK catalog.
This calligraphy artwork was inspired by a bathroom remodel, which we’re currently in the middle of. As we get closer and closer to the finish line, I’ve been considering the art pieces to display! Works by Elisa Ancori and Sister Golden caught my eye, but I wanted to make my own art for the space. In considering what to create, I came up with this concept: tiny calligraphy that creates the outline of a woman’s back. I think it’s the perfect artwork for a bathroom, and I kept track of my progress to write this tutorial! Read on to discover how you can make it, too.
1. Gather Your Supplies
First, download the Woman’s Silhouette Outline Template (it’s free!) by clicking here. You can print it out on any piece of paper!
This printable was created with US printers (8.5″ x 11″ paper size) in mind, but it will also work well internationally!
Next, cut a piece of drawing paper to 8″ x 10″ (203 mm x 254 mm). I like to use Strathmore 70 or 80 lb. drawing paper because it’s got a nice tooth and color to it!
You can find this paper at most local arts and crafts stores or on Amazon.
I chose to use Ziller ink for this tutorial because my artwork will make its home in a bathroom. Ziller inks aren’t phased by moisture or humidity, so I won’t have to worry about my artwork getting ruined over time!
2. Trace
A successful piece of calligraphy artwork always begins with a good draft! Start by placing your 8″ x 10″ piece of drawing paper over the Woman’s Silhouette Outline Template. The edges of the drawing paper should line up with the rectangle containing the silhouette. Then, place both the template and the drawing paper over a light box or against a bright window. Once you can see the template through the drawing paper, use your pencil to trace over it!
I love having a light box to do these sorts of projects with. That said, a bright window will work just as well!
Once you’re finished, your drawing paper should look something like this:
Try making light scribbles in the dark areas from the template to remind yourself which areas need shade!
3. Add Calligraphy
Now, it’s just a matter of going over your pencil draft lines with teeny-tiny words! First, I’d choose a text to use … that way, you won’t have to rack your brain for words as you move forward. I chose Shakespeare’s A Midsummer Night’s Dream, which is a fun and imaginative play! Use the tip of your Nikko G nib and very little pressure to pen the words along your pencil guidelines.
I recommend using the Nikko G nib for this project because it’s a medium-flex nib. That means it can write tiny words if need be! The calligraphy style here is the Kaitlin, but without a ton of stroke contrast (there’s no room for noticeably thick downstrokes!).
Continue to write over your pencil guidelines. Don’t pay a ton of attention to legibility or word logic; sometimes, you’ll need to stop and start sentences in strange places!
When you reach the woman’s hair, circle around and around with your words to fill it in. This will require rotating your paper a fair amount!
Below, you’ll find some guidance on what the hair should look like! Notice that I did one circle pattern for the hair on her head and a separate circle pattern for the bun. This helps to make the calligraphy artwork look a bit more realistic.
Keep on writing! It might take you a few hours, but it’s a relaxing and worthy project.
4. Erase
Once you finish tracing over your pencil guidelines, use a good eraser — and tons of caution — to erase the pencil marks. It is very important to give your piece the utmost TLC here! One wrong move, and you can wrinkle your artwork, which can be disappointing when you’ve put hours into it.
I like using Staedtler Mars plastic erasers. They generally can remove pencil marks off with minimal pressure, which reduces the risk of accidentally wrinkling your paper!
5. Display Your Calligraphy Artwork
Once you can’t see any pencil guidelines, your calligraphy artwork is finished! You can now frame, display, and impress.
For instructions on how to make DIY mats and frames, check out this blog post!
I think that this calligraphy artwork is absolutely perfect for a bathroom or bedroom! It represents a celebration of the human body and throws a nod to classic literature. The only potential downside? It can take a while to create! I spent around six hours on this piece in total. If you like the artwork but don’t have the time and/or desire to tackle making it, I recently added this art print to the TPK catalog! You can purchase it here.
I hope that you enjoyed today’s tutorial! It was a fun one for me to make; I love these kinds of projects. 🙂 Thanks very much for reading TPK, and have a wonderful weekend!